Setup of ITC Checklist Templates
Before you can create and work on checklists, you need to define corresponding templates on page ITC Checklist Template.

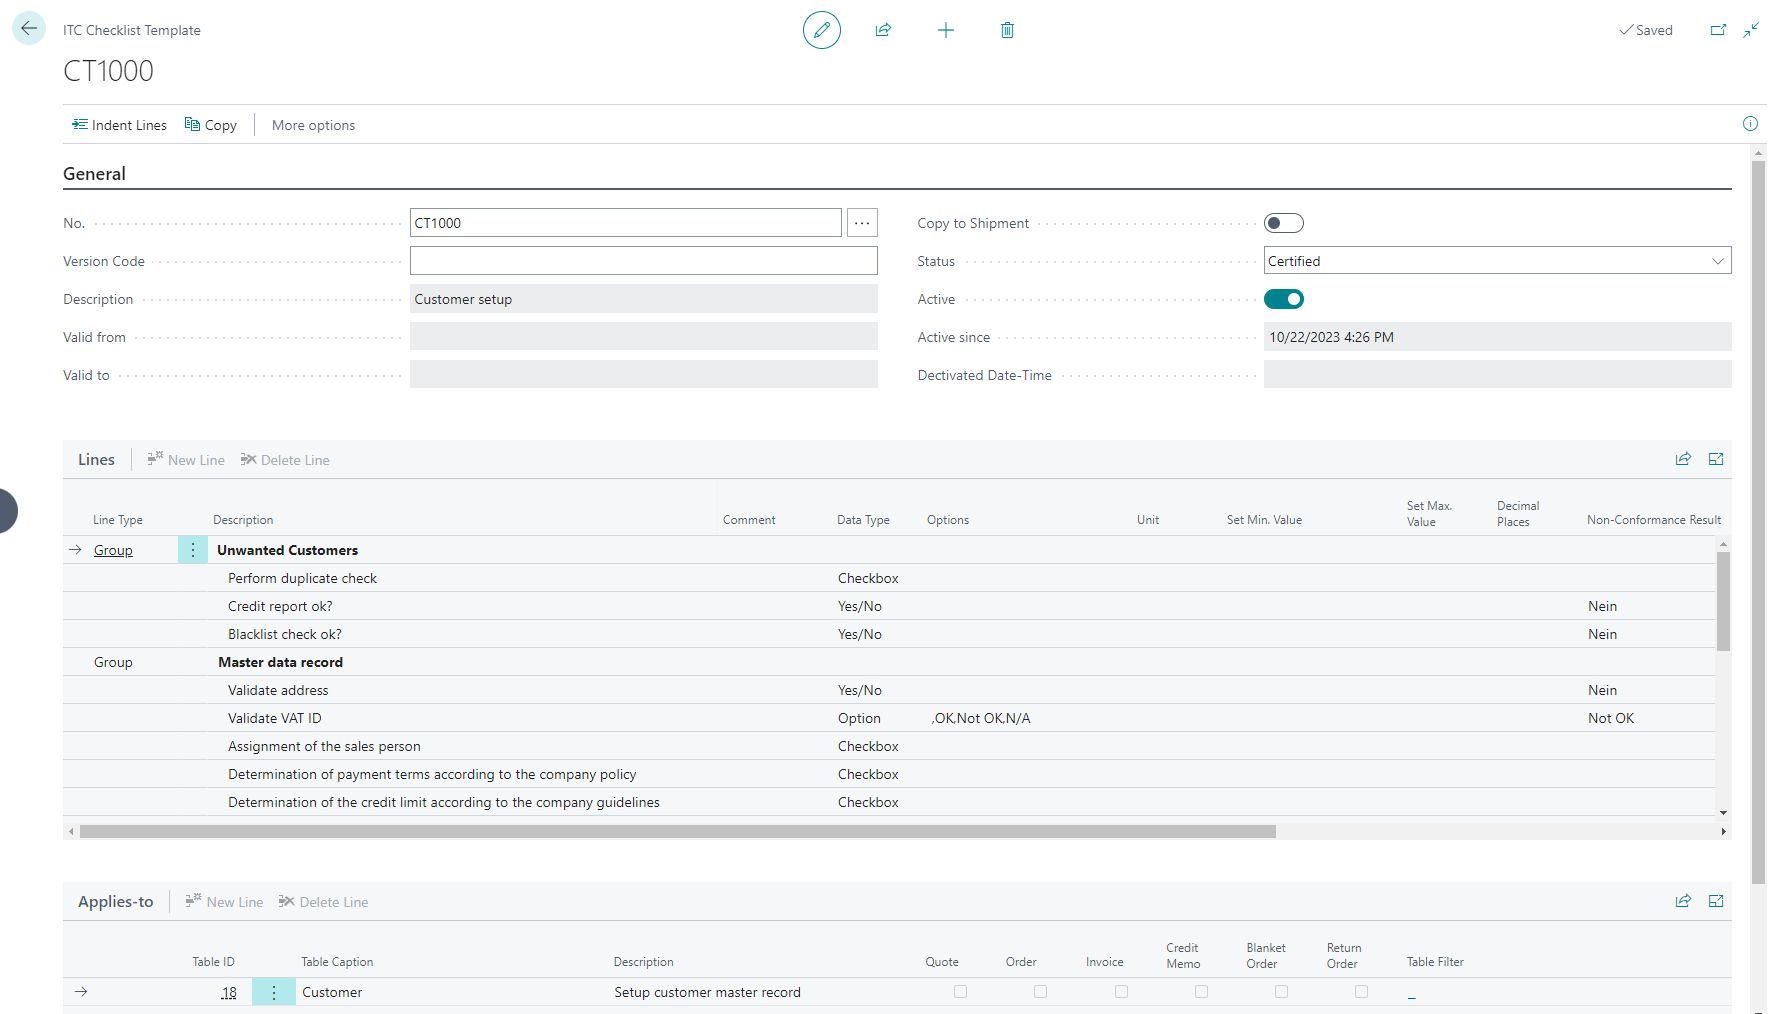
Here you can create your own customized checklist templates. These templates consist of a header that provides a brief description or title, and multiple lines that define the actual checklist items.
The Applies-to subpage provides you with a centralized hub for managing and accessing checklists associated with different tables within Business Central. This feature streamlines the organization of checklists, making it efficient for users to create, view, and manage checklists tailored to specific contexts, such as "Customer", "Job" or any other table. For tables that are associated with documents, such as "Sales Header" (Table 36) or "Purchase Header" (Table 38), you can further refine the selection by specifying the document types (Quote, Order, Invoice, Credit Memo, Blanket Order, Return Order) to which the template is applicable.
Adding a new ITC Checklist Template
General
- Choose the 🔎︎ icon, enter ITC Checklist Templates, and then select the related link.
- On the ITC Checklist Templates page, choose the New action.
- Proceed to fill or change fields on the ITC Checklist Template card as necessary.
User either the following table to learn more about the fields or hover over a field to read a short description.
Field Description No. Specifies the number of the checklist template, according to the specified number series. Version Code The Version Code allows you to oversee multiple versions of a checklist template. Although all versions will have the same No., only one version can be active at any given time. Description Specifies the description for the checklist template. Use this space to briefly describe the purpose, content, or any relevant details associated with the checklist. A clear and informative description can help users understand the template's intended use and make informed decisions when selecting or working with it. Valid from Specifies the starting date of the checklist template. Valid to Specifies the ending date of the checklist template. Copy to Shipment For supported tables like sales orders and purchase orders, you can choose to have the checklist copied to the shipment or receipt. Status Specifies the status of the checklist template. A checklist template must be certified before it can be used. Active Indicates whether this is the active checklist template version. Active since Indicates when the Checklist became active. Deactivated Date-Time Indicates when the Checklist was deactivated.
Lines
You are now prepared to populate the checklist template lines. Each of these lines signifies an individual item or task within the checklist, with each line corresponding to a specific action, requirement, or detail that requires attention.
-
When entering new lines first select the Line Type. For lines requiring user input, choose the blank option in the Line Type field, and ensure to select an appropriate Data Type for these lines.
Utilize the Group option to combine multiple lines into a cohesive logical structure. The Heading option is useful for defining sub-structures within a group, helping to categorize related items.
If you opt for the Radio Button Heading, remember that only one of the following lines within the section can be checked. This ensures exclusive selection within the designated group.
The Multiple Selection data type allows you to check multiple options from a predefined list. Use this field when you want to capture one or more selections for a specific attribute or category.
- For each line, enter a description and optionally add a comment to provide further guidance for the user.
-
If Line Type blank is selected then the Data Type must be specified. It refers to the type of data that can be entered or associated with that particular line. The choice of data type for a checklist item depends on the nature of the information you want to capture. It ensures that the checklist is flexible and can accommodate a variety of data, making the tool very versatile for applications with different needs and preferences.
Here's a breakdown of the different data types that might be used in the context of a checklist item:
Data type Description Yes/No Used when the checklist item requires a binary response, such as indicating whether a task is completed (Yes) or not (No). Decimal Useful when the checklist item involves numerical values with decimal points, like quantities or measurements. For example, specifying the weight of a tool or the hardness of the surface. Integer Suitable for checklist items that involve whole numbers, such as counting or ordering tasks. For instance, specifying the number of items tested. Text Allows for the input of alphanumeric characters and strings. Useful for checklist items that require textual descriptions, notes, or any form of detailed information. Checkbox Perfect for indicating whether a specific sub-task has been completed (checked) or not (unchecked). Option Helpful when the checklist item has a predefined set of choices, and the user needs to select one option from that list. For example, choosing a priority level or a category from a dropdown list. The choices are setup as a comma-separated string in field Options. The maximum length for a single option is 50 characters. Radio Button Used when the checklist item requires a single, mutually exclusive choice from a set of options. For instance, selecting a specific mode of operation or a category for a task. Multiple Selection Enables users to choose multiple options from a predefined list. Useful for checklist items that can belong to multiple categories or have several applicable tags. Date Used to represent a calendar date. Time Used to represent instances of time within a day. DateTime This is a composite data type that combines both date and time components, providing a comprehensive representation of a specific point in time. - The Options field must be populated only for lines with the Data Type Option. This field allows you to define and customize a set of choices or alternatives for a specific selection. Enter the various options separated by commas, providing users with a predefined list to choose from when filling out this line.
- The Decimal Places allows you to define the precision of decimal values for a checklist item. When configuring a checklist item with the decimal data type, you can set the number of decimal places allowed for numeric input. This feature ensures that the entered decimal values align with the desired level of precision. You can enter minimum, maximum, or both values for the number of decimal places, for example '1' to have exactly 1 decimal place, or '1:2' to have a minimum of 1 and a maximum of 2 decimal places.
- The Non-Conformance Result feature for non-numerical lines empowers users to customize and specify the conditions or outcomes that are considered non-conformant for a particular checklist item. This feature is particularly useful for scenarios where non-numerical data types, such as text or options, are involved. If for instance a checklist item involves selecting an option from a predefined list, 'Incomplete' or any other user-defined outcome may signify non-conformance.
- The Non-Conformance Action field empowers users to prescribe specific actions to be taken when a non-conformant outcome is identified for a checklist item. This feature ensures that users have a clear and predefined response plan, contributing to the overall effectiveness of the checklist management process.
-
These following fields offer users the ability to customize the appearance and formatting of the printed checklist:
Field Description Do not Print The Do not Print field allows users to exclude specific checklist items or sections from being included in the printed version. This feature is useful when certain details are intended for electronic use only and not necessary for a hard copy. Bold The Bold field enables users to emphasize particular checklist items or headers by rendering them in bold typeface when printed. This formatting option enhances readability and draws attention to important information. Italic The Italic field allows users to add a touch of emphasis or distinction to specific checklist items or text by rendering them in italicized typeface when printed. Underline The Underline field provides users with the option to underline specific checklist items or text, enhancing their visibility when printed. This formatting choice is often used for headings or important details. New Page The New Page field allows users to initiate a new page for the printed checklist starting from the associated item. This feature is beneficial for creating distinct sections or ensuring that specific content starts on a new page. No. of Blank Lines The No. of Blank Lines field enables users to insert a specified number of blank lines between checklist items or sections. This helps control the spacing and layout of the printed checklist for improved readability.
Applies-to
The Applies-to section allows you to specify the scope or context to which the checklist template applies. This could include for instance specific projects, customers, or orders.
When creating a new checklist, the system will only suggest relevant checklist templates based on the context. For instance, if a checklist is being created for a customer, only templates linked to the customer table will be available for selection. This ensures that users are presented with applicable options, streamlining the checklist creation process and promoting context-specific utilization.
-
The Table Id field allows you to specify the context or area of applicability for this checklist template. Enter the unique identifier associated with the relevant table. This ensures that the checklist is applicable only within the defined context, providing clarity and organization.
Out of the box, the following tables and documents are supported:
Table Id Description 15 G/L Account 18 Customer 23 Vendor 27 Item 36 Sales Quote, Sales Order, Sales Invoice, Sales Cr. Memo,Blanket Sales Order,Sales Return Order 38 Purch. Quote, Purch. Order, Purch. Invoice, Purch Cr. Memo, Blanket Purchase Order, Purch. Return Shipment 91 User Setup 110 Posted Sales Shipment 112 Posted Sales Invoice 114 Posted Sales Cr. Memo 120 Posted Purch. Receipt 122 Posted Purch. Invoice 124 Posted Purch. Cr. Memo 156 Resource 167 Job 5600 Fixed Asset 6650 Return Shipment Header 6660 Return Receipt Header Please contact us if you want to link a checklist template to a table not listed.
- In field Description provide additional details about the context or purpose of this line.
- If a Table Id is selected that has different document types, such as 36 Sales Header or 38 Purchase Header, you can explicitly restrict the application to selected document types by checking the respective fields like Quote, Order, etc.
-
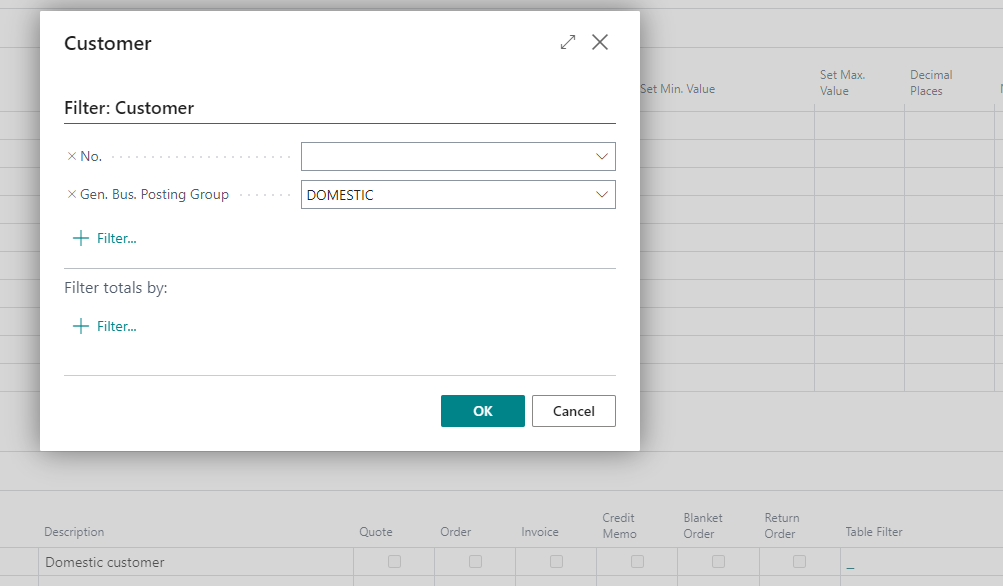
The Table Filter field in the Applies-to section allows you to refine the applicability of the checklist template by applying additional filters to the selected table. Use this field to specify conditions or criteria that must be met for the checklist to be applicable. As an example, the 'Customer' table could be filtered to include domestic customers only:

